
With WordPress, it’s easy to change the entire look and feel of your site in just a few clicks – without changing any of the page or post content you’ve created. Your site’s theme dictates things like colors, typography, layout, animations, and more.
WordPress has two different types of themes. Classic themes and block themes. In this guide we will be discussing how to change and edit a classic theme. We highly recommend for new users to try out a classic theme. See our guide on the difference between classic themes and block themes as well as our guide on theme and plugin recommendations for suggestions on themes to try.
How to change your theme (Classic Themes) #
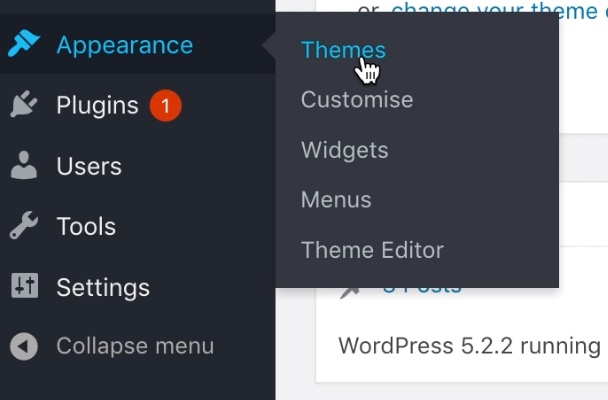
In the main WordPress menu, hover over Appearance and select Themes. This will bring up your themes dashboard, where you can see all the themes you currently have installed. Remember, when you change your theme, your content (ie: your posts, pages, links, images, etc.) will not be deleted. The theme automatically adjusts your content to fit the new theme.
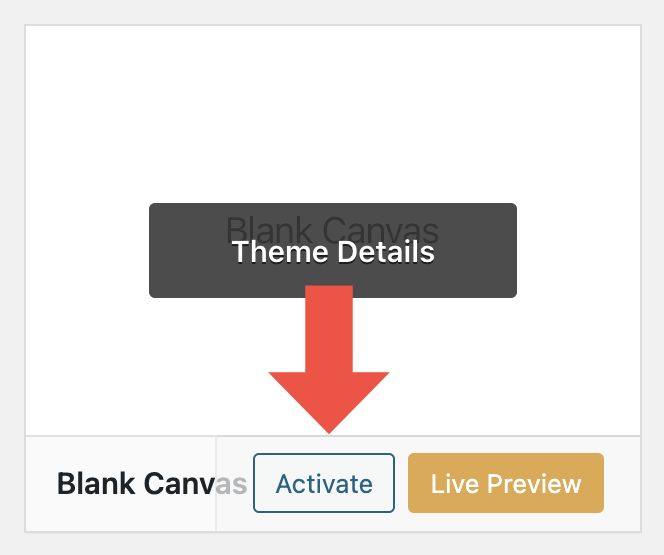
You may have more than one theme downloaded and available, but only one theme at a time can be active. If you want to see what your site would look like with a downloaded theme, hover over it and select Live Preview.
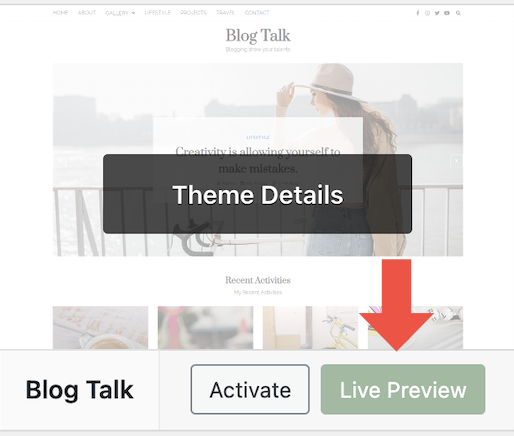
If you like the look of it, select Activate to apply this theme to your live site.
How to customize a theme (Classic Themes) #
To edit your site click Customize button in the black admin bar along the top of the screen. Customize is only an option for Classic Themes.

While every theme will look slightly different, here are some common options you will see.
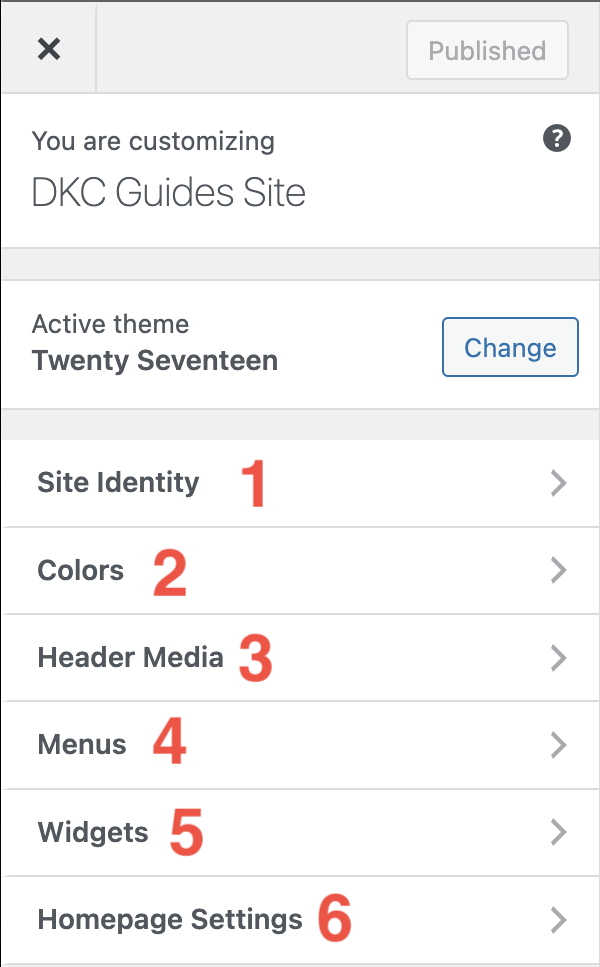
- Site Identity is where you will be able to customize the title of your site as well as the tagline. This is also the place that you can add a site icon, which is the browser icon you see when you load onto a website, as well as a site logo to go up with your title.
- Colors is the place you can go if you want to change the color of your site title and tagline! You can also choose if you want your website to be in dark or light mode! Other themes will give you access to accent colors and more options, but it will usually all be under colors.
- Header Media is where you will go if you want to upload a photo or video to the top of your site. In Twenty-Seventeen, you can also insert a YouTube link that will play when someone visits your site, or a static custom photo. In other themes, you might be able to have a slideshow of photos, or animated gifs.
- Menus are the navigational tool that visitors to your site will use to find the things that you post. After making a custom menu in the WordPress dashboard, this is where you will go to insert the menu into your site, as well as pick which pages will be your home page or blog page
- Widgets are the extra website features that are available with your theme. For Twenty-Seventeen, this includes things like a search bar, comment section, archived posts, and more!
- Homepage Settings for Twenty-Seventeen is where you will indicate whether or not you want to have your homepage be your blog posts, or a custom static page that you created in the WordPress dashboard.
Adding New Themes (Domain of One’s Own Users Only) #
If you are using our other web publishing platform Sites@UMW, you can only pick from a specific set of themes that are already pre-installed. However, if you have your own Domain of One’s Own site, you can download any WordPress theme you want! However, with great power comes great responsibility, so here are a few things you need to know about adventuring into the land of WordPress themes.
Downloading a New Theme #
WordPress comes with a theme automatically installed, usually named after the current year, but there are thousands of free themes to choose from in the WordPress theme repository. To add a new theme to your site, go to your WordPress dashboard and select Appearance then Themes. On the themes page click Add New found at the top of the page.

Here, you can scroll through themes, sorted by Featured, Popular, and Recent. You can filter through the themes and look for themes related to your subject. You can use the filter checkboxes to, for example, only view themes that are accessibility-ready or have a layout you like.
Once you find one you’d like to try, hover over it, and then click Install.

This theme will now be downloaded to your WordPress. You can either Live Preview it to see what the theme will look like or Activate it to immediately apply it to your live site.
All of the themes that you have downloaded will be under the themes page. For security and storage reasons it is always good practice to delete inactive themes by clicking on Theme Details then clicking Delete in the bottom corner.
NOTE: Please be aware that some themes will ask you to install plugins on your site or have a freemium model, where you’ll be asked to pay for full access to all the theme’s features. It’s usually worth reading through a theme’s reviews (if it has any) before you install it. These can be seen on the theme preview page.
Updated by Haley Gosman 10/24/24
