
Adding Users #
This guide is useful if you’re doing a group project or teaching a class and would like to have multiple people contributing to one website. The process is quick and easy.
- Log into your Domain of One’s Own account.
- Click on the domain you wish to add users to and follow the “wp-admin” link.
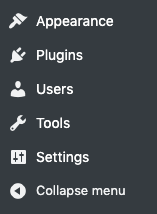
- Click on the Users tab on the left-hand side (see below.)
4. For the username, their NetID would work well but this can be anything the user may want.
5. For the email section, we recommend using their UMW email.
6. Enter the user’s first and last name, if so desired.
7. The Website field is a space where a user could share their personal website but you can leave the website section blank if not relevant.
8. WordPress should automatically generate a password. You can send this directly to the user but not necessary as the e-mail they receive about their new account will give them the option to reset their password.
9. Select the role you’d like to give them. See the roles section below for details about what different roles allow.
10. Click “Add New User” at the bottom.

** Note: If your new users are not receiving the e-mail have them check their junk/spam folder. These e-mails almost always end up there. **
What are roles? #
Each role has a different purpose and different privileges. To learn more, read the WordPress guide on roles and their capabilities.
- Administrator (slug: ‘administrator’) – somebody who has access to all the administration features within a single site.
- Editor (slug: ‘editor’) – somebody who can publish and manage posts including the posts of other users.
- Author (slug: ‘author’) – somebody who can publish and manage their own posts.
- Contributor (slug: ‘contributor’) – somebody who can write and manage their own posts but cannot publish them.
- Subscriber (slug: ‘subscriber’) – somebody who can only manage their profile.
How can users login? #
Once users are added to your site they will need need to go to a specific URL to access the WordPress dashboard. You can direct users to go to the URL of you site and add “/wp-admin” to the end of the URL. For example:
myawesomesite.com/wp-admin
If they are already logged in this will take them to the dashboard or if they are not it will take them to the WordPress login page for the site:

There they will login with the username/e-mail and password for the site.
If a user forgets their password they can click “Lost your password?” and enter the username or the email address associated with the account that was created. Please note that this username or e-mail is not necessarily your UMW NetID or your UMW email, it will depend on how the user account was set up. After the request is submitted an e-mail with a link to reset your password will be sent to the e-mail address associated with the account. These emails typically go into your junk folder so be sure to check there..
Reviewed by Haley Gosman 10/24/24
